December 31, 2012

.2012.

This has been an amazing year for me and my little family. We have truly been blessed this year and I just wanted to take a little time to recap some of our highlights.

Halloween 2012
Starting back in January I was able to really start taking charge of my mental and physical health. It's still a work in progress but I feel like I've come a long way from where I was 12 months ago. This also lead me to meet some of the most amazing women ever, who have all touched my life in ways I couldn't even imagine.

Mo, Elyse, myself and McKenna
I did my first 5k, with the afore mentioned women! It was my only 5k of 2012 but it will not be my last, as I hope to do many more in 2013 and possibly even a half marathon!

Ms. Purple pants was my amazing trainer, Miki! 
I have fallen even more madly in love with my amazing husband. He has supported and motivated me in all of my crazy ideas and efforts this year. We will have some tough times in 2013, courtesy of the  military, but we are ready for it! I'm looking forward to all the great memories we will make this next year!


Tyler has grown in leaps and bounds. It's been amazing to see how much she has changed this year. She has started walking, occasionally sleeping through the night, saying a few words, signing and is just so full of spunk, sass and life.
Christmas 2011
Christmas 2012
She traveled to 21 different states, most of that during our 2,700 mile cross country move from Georgia to Washington, but some of it to Virginia and Texas to visit grandparents and other family! She flew on four airplanes, three of those trips went awesome and the other one.... well we won't talk about that one! Haha.
Visiting Nana and Papa, May 2012
She went hiking for the first time. She went to her first zoo, in Atlanta and then her second zoo here in Tacoma. She saw Mt. Rushmore, one of her mama's favorite places! I can't wait to see what 2013 has in store for the little peanut!

Mt. Rushmore in August 2012


So, all in all it's been a wonderful year for us. I'm hoping 2013 will be just as blessed!

November 2012


XO


December 12, 2012

.diy card holder.

This year we have actually done some Christmas decorating! It's pretty exciting. We have our cute little (fake) tree. Some things on the mantle. I'm loving how festive it makes the house!


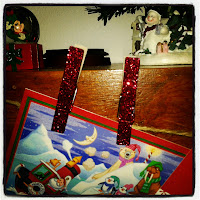
One thing that I was missing, however, was a Christmas card holder. I looked around and found a few but none really caught my fancy. I was talking to le man about it and he suggested just putting up some twine that he already had and clipping the cards on to that. I kind of took the idea from there and got some clothes pins and glitter. Bam! Super easy and inexpensive card holder.


I love the way these turned out. I simply painted some mod podge onto one side of the clothes pin, then dipped it in super fine red glitter. Let it dry overnight, then they are ready to go! I might go back and glitter the whole clothes pin later, but that will be a lot messier so for now one side looks pretty awesome!

XO


November 8, 2012

.baby's first shadowbox.

For today's edition of nap time crafting, I bring to you the shadowbox! The idea came from, of course, Pinterest. I saw, and pinned, two great inspirations. This one, from a frame shop. And this one, from The Mama Dramalogues.

I kept all of the little momentos from the hospital and have had them stored away in a little box just waiting for this project. I used those, her going home dress, and a photo from her first night (I order my photos from Snapfish and love them!). Everything else I got from JoAnn's. I used 3 pieces of scrapbook paper and some scrapbook embellishments, the paper flowers and glitter buttons.


I have to say, I am extremely happy with how this turned out! The great thing about this project is that it is 100% customizable. You can put whatever keepsakes you want in it, whatever pictures, cute little decorations, etc. This is going to look awesome in her nursery!

Also, just a reminder, if you do this project and have a blog you put it on, make sure to blur out any information you don't want the whole world to see on the hospital bracelets and things.

XO!

November 7, 2012

.one thing crossed off the list.

Thanks to many adorable ideas on different blogs, pinterest, etc, I have about a million things on my to-do list for our new house. We're just renting so it's mostly small things, but there's a million of them none the less. I have officially completely one task from the list and I'm pretty excited about it. We have a small wall right in front of the front door. To the right leads to the dining room, to the left leads to the living room. I thought this little space would make a fantastic frame wall. And it did.


The best part, everything was very easy to do. The man already had the flag, so I simply put it up there with some tape dots on the back. I got the white frame from Home Goods, and put one of my favorite pictures of me and Brian from last November. A friend of the man's gave him the incredible Ranger tab and crest pieces. They are really beautiful pieces carved and then burned for contrast. I got the P and the Welcome from JoAnn's. I painted the Welcome with craft paint and spray painted the P with some spray paint also from JoAnn's. You'll notice the wall is brick, which means no nails. I am in love with the Command No Damage Hanging Strips. They are seriously awesome. I'm not going to put a single nail anywhere in the house!!

So, there it is. Task one, done! Next on my list is the living room and nursery. I'm hoping to finish them up in the next month or so but we will see if that works out, haha. I am doing a couple of cute crafts for the nursery right now though and I will put them up here when I'm done!

XO!

October 15, 2012

.bacon.

The trainer I was working out with in Georgia told me once "A day without bacon is like a day without sunshine." I agree, but do try to limit our bacon consumption to a little less than once per day. For the last few weeks though, when we wanted a bacon fix this has been my go to side dish, with a few changes depending on what veggies we had in the house. Bacon pretty much goes with every single vegetable I can think of so, go crazy!


Bacon and Brussels Sprouts serves 2
10-15 large Brussels sprouts
3 slices of bacon
1 cup of chopped tomatoes
1 avocado, cubed 

In a non-stick skillet fry up the bacon. While that's cooking peel the outer leaves off the Brussels sprouts and then cut each sprout into fourths. Chop the tomatoes and avocado. 

After the bacon is done remove it from the pan and place it to the side. Now you can leave all or some of the bacon grease in the pan, or take all of it out and replace with a cooking spray or olive oil. It's up to you, we use a portion of the bacon grease. Put the Brussels sprouts and tomatoes in the pan with the grease, stirring occasionally. 

Once the Brussels sprouts are cooked through, roughly 7-8 minutes, place the veggies in a serving platter, mix in the avocado and bacon and serve! 


We have also done this with broccoli and it is equally as delicious. 

XO

October 9, 2012

.homemade frozen soy yogurt drops.

Store bought baby snack foods are easy. There I said it. They are convenient, they are quick, and they are just plain easy. Because of this we have been reaching for these snacks for Tyler a lot more than I would like to admit. In between the prepping for the move, the move and now getting settled into our new house in Washington, I just didn't have the time or motivation to be making her labor intensive snacks. We try to give her the healthiest things we can, and it helps that she loves fruits and vegetables, but sometimes there is just nothing easier than a handful of cheddar bunnies or Kix cereal, ya know?

The more settled we get, however, the more I try to change this. One thing I've been seeing at the grocery store are yogurt melts. I haven't been able to buy these for her because of her dairy issues but I have found soy yogurt that she loves and that actually gives her some protein instead of all the carb filled snacks that seem to be so popular with the bebes. After seeing the yogurt melts in the store and then seeing this on Pinterest, I knew I just needed to take matters into my own hands!

The soy yogurt my local grocery store has does come in a few flavors (vanilla, peach, blueberry, etc) but these usually have some added processed sugar and we would like to avoid that, so I bought the plain soy yogurt and then added some particularly ripe raspberries. This would also be great with pretty much any fruit, so over time I'm sure I will make them with strawberries, kiwi, peach, blackberry.... maybe even a little bit of honey or peanut butter!


Frozen Soy Yogurt Drops makes multiple snack servings
1 cup of soy yogurt (or regular if your bebe can have it!)
1/4 cup ripe raspberries

Cover a cookie sheet with tin foil or wax paper.

Mash the raspberries and yogurt together until they are completely mixed. If you wanted them to be smoother you could throw it in a food processor, but Tyler doesn't mind the texture. Using a small spoon place drops of the yogurt mixture onto the cookie sheet. Place in the freezer for 30 minutes, or until frozen. Pop the drops off the foil and either place them in a tupperware container to store them in the freezer or eat immediately!

I've got to be honest, these are so tasty that I find myself sneaking them sometimes. I might even have to make some of my own soon with my greek yogurt. Tyler is absolutely loving these and I'm glad I found the soy yogurt so she can finally enjoy stuff like this! She loves it unfrozen with some granola too!

For those of you looking for soy yogurt, I found our's at Fred Meyer in the natural food section. I have never seen it anywhere else but I also have never really looked so it's entirely possible other places have it, especially if they have a natural food area.

XO

July 29, 2012

.la bebe has an un-birthday.

I can't believe it took me so long to write this up. Wait, no, I can. This is me we're talking about. :) Regardless, 2 weeks ago we threw an early birthday party for la bebe. We dubbed it the Un-Birthday and it was a wild and crazy awesome time. We had it a month early because we knew we were going to be moving before her birthday but not the exact date. We wanted to throw her a party where our friends could come, versus it just being the three of us on her actual birthday half way across the country.

The "theme" was nice and simple, polka dots. I had a ton of fun doing everything and I'm so glad everybody who came out could join us! Now here's what everyone really wants from first birthday's; the pictures!

I decorated her high chair with ribbons and she had this cute sash for the cake smashing. 


Don't mind that stupid balloon that died.


Her cute little tutu'ed* booty.


We played pin the candle on the cupcake**!  


The spread! I was really proud of how it all turned out! We had turkey meatballs with sweet chili sauce, goldfish and teddy grahams, guacamole and pita chips, a fruit salad, chocolate dipped oreos with sprinkles, cupcakes and the smash cake! 


Chocolate dipped oreos with sprinkles, shredded coconut and nuts are super easy! I did them the night before and it was pretty fun. They also tasted great! There is a great tutorial here.


No recipe for the cupcakes because I totally used a box mix! Yeah! Ha.


Made the little lady a vegan chocolate cake. No recipe for that either cause I didn't like it. 


She seemed impressed though.


Tentative at first.


And then not so tentative. :) She didn't really eat a lot of the cake but she went to town on the icing.


Sugar high!!!


Close up of the aftermath. 


All in all it was a fantastic day. I'm so glad for all the awesome friends we've made here and I'm glad Tyler got her 1st birthday party! Even if it was her un-birthday. 

XO

June 17, 2012

.long time no see.

Hello!! Man, what happened there?! Things have been a little crazy around this casa. We haven't been doing much of anything that has been blog worthy and big news! We're moving! Not sure of the exact date but it is most likely in the very near future and it is another cross country move, Georgia to Washington. The Alaska to Georgia move was incredible but we will see how this one goes with a baby and a cranky cat. Eek!


For now though, I have something delicious to share with you for Father's Day. The man requested oatmeal waffles for breakfast and that's what he got! This is one of our favorite, quick and easy breakfast recipes. I've made them multiple times now but have never gotten around to taking pictures before we gobbled them up. Today though I made it a point!

These waffles are super tasty. They are soft and fluffy on the inside, crunchy on the outside, and the oatmeal adds a really great texture to them. Even la bebe loved them. Although, that's not saying much, she eats everything.

Oatmeal Waffles makes 3 waffles
1 cup oats
1 cup buttermilk (or almond milk or regular milk, with a small amount of white vinegar added)
1/4 whole wheat flour
1 tablespoon sugar
1 tablespoon cinnamon
1/2 teaspoon baking powder
1/2 teaspoon baking soda
pinch of salt
1 egg
4 tablespoons butter, melted

Combine the oats and the buttermilk in a small bowl and let sit while you prepare the other ingredients. I usually try to let them sit for at least 15 minutes.

In a large bowl combine all of the dry ingredients, mix. Add the egg and melted butter to the wet ingredients. Then add the wet ingredients into the dry ingredients. Mix thoroughly. Pour into the waffle maker or you can make pancakes with this recipe as well (we prefer the waffles though!).

Serve with maple syrup, fresh fruit, chocolate chips... whatever your heart desires! Enjoy!

XO

April 30, 2012

.asparagus, my love.

Up until 2 weeks ago I had never tried asparagus. I know! I don't know what was going on there either. After trying it though it has quickly become a staple in the weekday meal plans. There's still many ways I would like to try it but for now I want to share with y'all a mucho delicioso preparation I tried last night.


Sauteed Asparagus with Onion and Goat Cheese serves 2
1 bunch of asparagus
1/2 medium onion, sliced
2 ounces goat cheese
1-2 tablespoons olive oil
Garlic salt for taste

Heat a large saute pan with a bit of oil. I err on the low side but you could add up to 2 tablespoons.

Once the oil is hot add the onion slices and a bit of garlic salt. Let cook for about 5 minutes until they start getting tender. Then add the asparagus to the same pan. Saute until both the onion and asparagus are to the tenderness you prefer. Plate the veggies then crumble the goat cheese on top.


Enjoy! I put mine over a bed of spinach and served it with almond meal-encrusted, pan-seared tilapia.

XO

April 16, 2012

.breakfast of champions.

I recently saw a recipe for a cheesy rice and egg bake. It looked mighty tasty and I thought maybe I could do something similar with quinoa and make it a little bit healthier than adding a cup of cheese to it. I kind of threw this all together based on what I had in the kitchen and I must say, it was super delicious. Also full of protein, complex carbs and goodness.


Quinoa and Black Bean Egg Bake serves 4
8 eggs
1 1/4 cup unsweetened almond milk (or regular milk if that's what you drink)
1/2 cup quinoa
1 15-ounce can black beans, drained and rinsed
2 ounces goat cheese
Salt, pepper and chili powder to taste

The black beans and quinoa made a delicious "crust" on the bottom of the eggs.

Preheat the oven to 400 degrees.

The man loaded his second piece up with salsa!
Combine the eggs, almond milk, quinoa, black beans and spices in a large bowl. Beat well. Pour into a greased 8 x 8 pan (I used Pam spray). Crumble the goat cheese around the pan.

Cook for 45 minutes or until the eggs are set. Enjoy! This makes a great breakfast, lunch or dinner. You could also add any other veggies you want and switch the cheese up.

XO

April 14, 2012

.dresser to book shelf.

Well, technically we are using this as a media console for the time being but, eventually it will just be a cute book shelf.


Not gonna lie, I am feeling pretty freaking awesome right now. I drilled. I sawed. I hammered. I sanded. Perhaps I should back up a bit though, eh?

Paint, marks, gouges. Ogh!
Last summer the man and I got some POS unfinished dressers from some people who, to put it mildly, let their kids totally abuse the furniture. There were gouges, writing in pen and pencil, paint splatters, etc. We were feeling crafty though and thought we could redo them. We managed to get one done before la bebe came but the other one was going to require a bit more TLC so it has just been sitting in our room. For 8 months. Yeah. I hated looking at it and was tempted to just toss it because it seemed like it was going to be too much work to get the drawers in functioning order.

This was the top of the dresser. Probably the most damaged area.
But then la bebe kind of made a decision for us! She has started crawling (oh boy!) and of course the first things she goes for are the cords for the wireless router and TV. So, we needed a media console to house all of those, ASAP. Our bookshelf was also starting to get over run with DVDs! I was looking at the dresser one night a few weeks ago and a light bulb went off. I didn't want to just toss it and waste it, and repurposing it into shelves would solve the dilemma of how to fix the drawers. So, the fun began.


Here's a before of the living room. Crowded bookshelf and wireless stuff to the left of the fireplace, TV and Wally bed to the right.

Once I got started it was pretty easy. I removed all the hardware from the drawers, except for the top two small drawers, which worked and we decided to keep them in. I measured, bought my supplies and started fixing the bad boy up.

I had to add these to each side so the shelves had something to sit on, there were already the supports along the back though.
The piece is not completely finished. I still need to add trim and I'm planning on covering the back of the shelves with fabric, since the wood on the back is a cheaper piece of particle board than the rest of the wood. There are also still some pretty deep gouges that didn't get covered 100%, but I'm sure I will repaint this in the future so I will just go over everything again.

In order to get it from this


To this


I simply sanded, filled in the gouges as best I could with wood filler, sanded some more, sprayed it with Killz to keep the pen and marker from bleeding into the new paint, installed the shelves, then painted multiple coats onto everything. I also added some felt to the inside of the top drawers.


It sounds pretty easy when it's all condensed into a nice little paragraph (or, you know, run-on sentence, cause that's how I roll). Really though, it involved a good bit of work. It took much longer than I expected it to, mostly thanks to la bebe. There was nothing too terribly complicated about it though and I really think anybody could do this with the right tools. The only "special" tool you might need is a hack saw, if you need to cut the corners off the shelves before installing them, like I did. Other than that all I used was a hammer and screw driver!

I'm not sure how interested anybody is in the specifics of how I installed the shelves but if you're interested let me know in the comments and I will try to write up more detailed instructions! I figured I would just show you guys, maybe give somebody an idea, and show off my awesome handy-woman work! I really am very excited about how the whole thing is turning out. Now I just need to find some cute baskets to put in the shelves!

XO